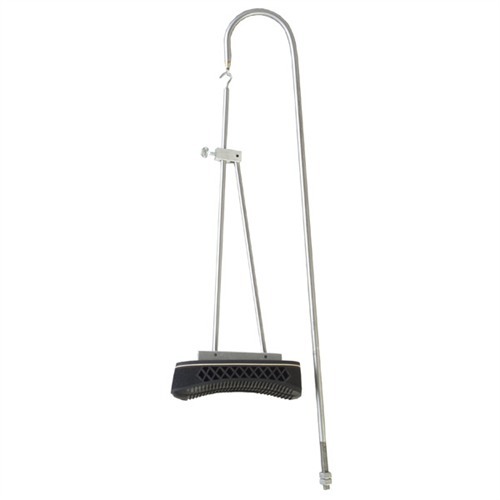
One of the most difficult aspects of fitting a recoil pad has always been the final fitting of pad to wood because it is so easy to hit the stock with the disc, sanding strip, or file - and ruin the finish. The B&R Recoil Pad Fitting Jig removes the risk of stock damage by letting you finish the pad completely off - and away from - the stock. The Jig is composed of two basic pieces: (1) an adjustable triangle on which the pad is mounted to be dressed to size, and (2) a universal support that attaches to the sanding disc table. Operation is simple. First, cut the stock to the length and pitch required to fit the customer. Attach the pad to the stock, and sharply scribe the outline of the stock on the pad. Then transfer the pad to the base plate of the Jig, set the angle of pitch, put the Jig on its support, and dress the pad to the point of just removing the scribed line (this is necessary as the line was drawn outside the stock). Finally, test fit the pad to the stock and do any final dressing by hand, if needed. The lines of the stock are carried correctly into the pad - and you have a perfect fit! The Jig eliminates all damage to the stock finish and reduces the entire pad mounting operation to a simple 15 minute exercise - making the job an easy and highly profitable one.
SPECS: Steel support is 20-1⁄4" (51.4cm) long. Steel triangle legs are approximately 11-1⁄4" (29.2cm) long. Aluminum base plate is 3-1⁄2" (9cm) long. Includes instructions.
Einer der schwierigsten Aspekte bei der Anpassung eines Recoil Pads war immer die endgültige Anpassung des Pads an das Holz, da es so leicht ist, den Schaft mit der Scheibe, dem Schleifstreifen oder der Feile zu treffen - und das Finish zu ruinieren. Der B&R Recoil Pad Fitting Jig beseitigt das Risiko von Stockschäden, indem er es dir ermöglicht, das Pad vollständig außerhalb des Schafts zu bearbeiten. Der Jig besteht aus zwei grundlegenden Teilen: (1) einem verstellbaren Dreieck, auf dem das Pad montiert wird, um es auf die richtige Größe zu bringen, und (2) einer universellen Halterung, die an der Schleifscheibenplatte befestigt wird. Die Bedienung ist einfach. Zuerst schneidest du den Schaft auf die Länge und den Neigungswinkel, die für den Kunden erforderlich sind. Befestige das Pad am Schaft und ziehe scharf die Kontur des Schafts auf das Pad. Übertrage dann das Pad auf die Basisplatte des Jigs, stelle den Neigungswinkel ein, setze den Jig auf seine Halterung und bearbeite das Pad bis zur Entfernung der skizzierten Linie (dies ist notwendig, da die Linie außerhalb des Schafts gezeichnet wurde). Schließlich überprüfe die Passform des Pads am Schaft und mache, falls nötig, die letzten Anpassungen von Hand. Die Linien des Schafts werden korrekt ins Pad übertragen - und du hast eine perfekte Passform! Der Jig eliminiert alle Schäden am Schaftfinish und reduziert den gesamten Montagevorgang des Pads auf eine einfache 15-minütige Übung - was die Arbeit einfach und äußerst profitabel macht.
SPECS: Der Stahlträger ist 20-1⁄4" (51,4 cm) lang. Die dreieckigen Stahlbeine sind ungefähr 11-1⁄4" (29,2 cm) lang. Die Aluminium-Basisplatte ist 3-1⁄2" (9 cm) lang. Inklusive Anleitung.